

Introduction: All manufacturing processes have certain limitations, as even machines cannot produce particularly smooth shapes. 3D printing, due to its own manufacturing principles, does not produce a very smooth part just after printing due to the presence of layer thickness, so some post-processing is always required. Sanding is the most common post-processing technique in 3D printing and is also the most labor-intensive aspect. So how do you sand a printed part?
Sanding parts is always time-consuming and labor-intensive, and it is the most discouraging step. However, there are techniques that can help people sand faster and more professionally. Today, we will focus on sanding PLA as an example of what to do when sanding parts and how to do it to get a smooth part surface.
△Print smooth parts to save grinding time
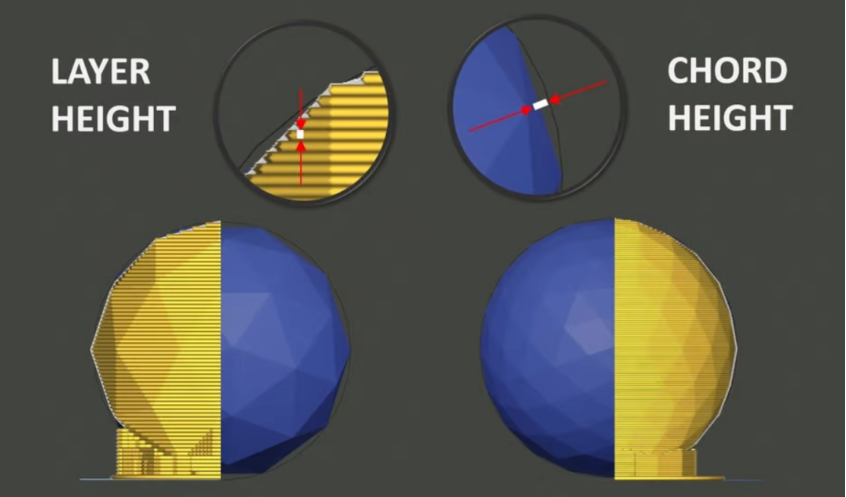
To avoid a lot of subsequent sanding, the most effective way is to improve the accuracy of the part when printing it, for example by printing parts that are easy to sand and reducing the layer thickness. This can be set up in the slicer, and the smaller the layer thickness of the layered part, the higher the accuracy and the less the amount of sanding.
● Like most plastics, PLA is water-absorbent, which means it absorbs moisture from the air. PLA passing through the printer nozzle can leave a rough surface. Most of the new cables that have just been opened for use are vacuum-packed and come with a desiccant, so using new cables can circumvent the effects of water absorption. However, cables that have been in use for more than a few weeks should only be stored in a dry place or dried before printing to minimize the effects of water absorption.
● The way the 3D model is exported from the design software also has an impact on the surface quality of the final printed part. The chord height is the maximum allowable deviation of the STL file from the source model. A lower chord height means that the model will have a higher polygon count, thus reducing the polyhedral angles seen on the surface. When exporting STL files, keeping the chord height well below the print layer height will improve the surface quality. If you have downloaded an STL file from a shared site such as Thingiverse, you will not be able to change the chord height. Usually, however, STL files on repositories tend to have a good resolution, so you don't need to worry about this.
Once you have a smooth STL file, you can change the slicer settings, and there are a number of settings that can help reduce the amount of sanding required. A few settings are listed here for reference.
1. Print orientation plays an important role in surface quality. Overhanging areas need to be supported, resulting in a very rough surface. If possible, choose a suitable print orientation to reduce the visible signs of support.
2. Within reason, the layer height can be set to a small value. Very low layer heights add significant print time, but will produce a smoother finish. Shapes with vertical walls and flat tops can be smoother than angled walls or domed tops.
3. Wall thickness is very important for sanding. You can set a little extra wall thickness before printing to prevent sanding too deep later. Otherwise, defects such as holes may be created. When sanding later, the thin walls will deflect and leave an imprint pattern in the filler. In addition, the part needs to be held firmly in place when printing to prevent breakage of fragile parts.
4. A reasonable setting of the printing speed, too fast may cause the printer to vibrate and produce a rough avoidance. Therefore, please slow down the printing speed of the machine to reduce the vibration.
5. The unique slicing software function also helps to achieve smoother 3D printing.
Why do you polish?
△Polished model
The sanding process is indeed a time-consuming and energy-consuming process, so why exactly do you need to sand? There are several reasons.
● Safety and comfort: Removing sharp edges and rough surfaces to improve safety is necessary. PLA is not very sharp, but can cause human discomfort in wearable applications such as clothing or prosthetics. When sanding, sharp points can be removed first with coarse sandpaper or a file. It can be easier to power sand in subsequent steps without tearing the sandpaper.
● Precision fit: If you are assembling mechanical parts, precision is important. Shafts and holes require a clearance, interference, or transition fit based on the precise clearance of their function, but depending on the accuracy of the printer, these fit sizes will require some adjustment. Test mating parts and mark areas to be removed before and during grinding, and be careful not to sand too deeply.
● Aesthetics: The appearance of the print is important, especially for functional pieces such as movie props or marketing presentations.
△Tools required for grinding
△ Different sandpaper for sanding
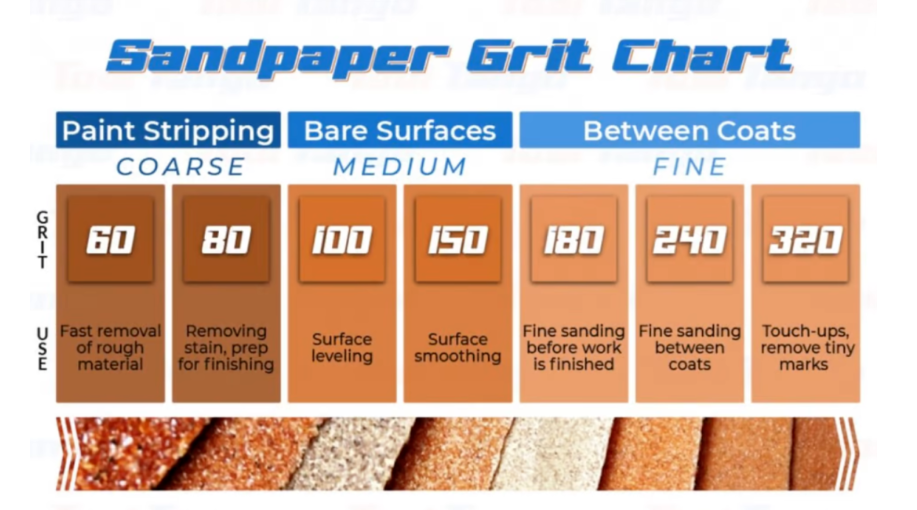
Regardless of the reason for sanding, you need to start with a quick removal of material, i.e. rough grinding. This speeds up the overall speed of sanding. Sandpaper is available in various types of grit (roughness). Coarse grit (60 or less) is used for fast material removal. Medium grit (60 to 80) is used for smoothing prior to priming. Fine grit (100 to 120). Very fine grit (150 to 220). Ultra-fine (400 or higher) is used for polishing and buffing after painting.
Usually, cheaper sandpaper uses a poor binder and the sand will come off from the paper. Worse still is the inconsistent grit of sandpaper. A single coarse grit on a fine paper can leave deep scratches and "undo" the sanding process in between. For this reason, it is important to clean the part before replacing it with finer sandpaper to remove any remaining coarse particles.
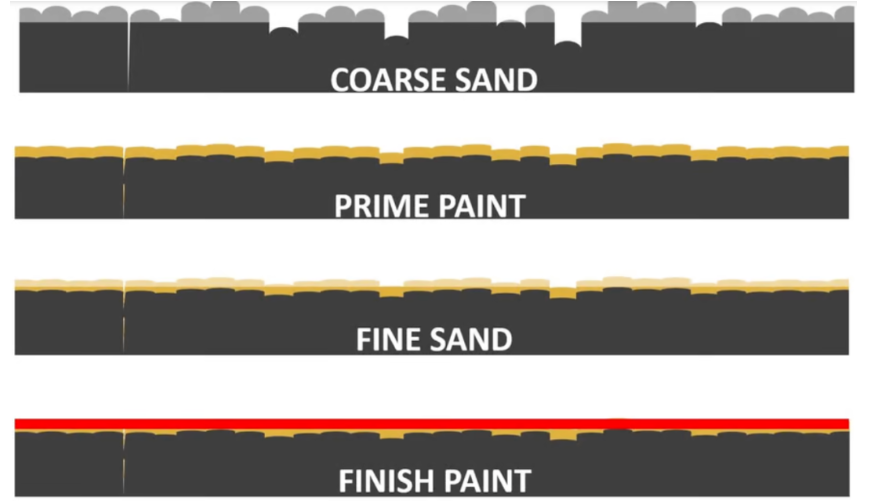
△Rough surface to smooth surface
The printed surface of a part has peaks and valleys. Wave peaks consist of print layers, support materials, printer artifacts, or STL nodes. The troughs are the spaces and gaps between the layers caused by interrupted nozzle flow. To make the surface smooth, the crests are flattened by removing material and the troughs are filled with filler or primer. The sanding process once again starts with a single pass with coarse sandpaper to remove almost all the peaks. Then, a finer grit sandpaper is used to further remove the scratches from the previous step. Wet sanding can be used for finer grit. Using a little water helps remove debris and prevents the paper from sticking, as primer and filler can stick to the paper and clog the grit. But most importantly: remember to always use a dust mask and goggles while sanding!
●ABS and PETG are popular printed filaments that can be steam smoothed, thereby temporarily dissolving the surface material using a solvent.
● Rubber materials tend to get dirty if too much force is applied. Fast, gentle sanding works best. Use wet sanding on sticky materials to avoid catching material and clogging. If the rubber wants to catch the grit, use finer sandpaper.
● Fibrous materials such as wood and composite filaments should be sanded in the direction of the grain. Remember to wear gloves when sanding or some fibers will scratch your fingers. Wet sanding will prevent the composite fibers from becoming airborne, but you still need to wear a dust mask at all times.
● Metals take longer to sand, but can achieve a high gloss. Over time, oxidation can dull some metals such as aluminum and copper. Add a clear coat to prevent oxidation or polish to restore luster.
● High density polyurethane foam is easily sanded with medium grit. Keep a vacuum running as sanding dust will continually float in the air. Polystyrene foam can be melted by paint, so test with scrap before you put too much time on the part.
● Glass and ceramics are harder than the grit in some sandpaper. Special sanding stones, wooden sticks or mud are required.
Sanding a 3D printed part is not an easy task, it directly determines the surface quality of the part, so after reading the sanding method compiled , will you have some inspiration? Try it out, and look forward to your smooth parts.